Network Automation Text Parsing Landscape
Whether you like it or not, the networking industry is stuck with (and will be for many years to come), vendors and devices with no API, inconsistent interfaces, differing configuration and runtime CLI formats. This means that as much as you hate screen-scraping and regex, it's here to stay. In this post I'll dig into some parsing tools in the current landscape that will help you accomplish your network automation goals with minimum amounts of regex, which in turn will lead to minimum 🤬.
One point to make before diving in, is that there are two distinct use-cases. First, extracting structured data from semi-structured text output, and second, taking structured data and feeding that data into a template engine in order to generate something from it (think configuration generation with Jinja2 templating). This post is discussing the former.
Template Text Parser
Template Text Parser (ttp) is the newest tool to the landscape and it's one that I quite like. It is simple to use, but has some tricks up its sleeve if you need to parse something more complex.
If you are familiar with Jinja2 templating language, then you will like ttp. Think of it as reverse Jinja2 templating (not technically analogous to Jinja2, but syntactically similar). Here is a simple example from the documentation to parse interface data from a Cisco device.
from ttp import ttp

data_to_parse = """
interface Loopback0
 description Router-id-loopback
 ip address 192.168.0.113/24
!
interface Vlan778
 description CPE_Acces_Vlan
 ip address 2002::fd37/124
 ip vrf CPE1
!
"""

ttp_template = """
interface {{ interface }}
 ip address {{ ip }}/{{ mask }}
 description {{ description }}
 ip vrf {{ vrf }}
"""

# create parser object and parse data using template:
parser = ttp(data=data_to_parse, template=ttp_template)
parser.parse()

# print result in JSON format
results = parser.result(format='json')[0]
print(results)

########################
#        Output        #
########################

# [
#     [
#         {
#             "description": "Router-id-loopback",
#             "interface": "Loopback0",
#             "ip": "192.168.0.113",
#             "mask": "24"
#         },
#         {
#             "description": "CPE_Acces_Vlan",
#             "interface": "Vlan778",
#             "ip": "2002::fd37",
#             "mask": "124",
#             "vrf": "CPE1"
#         }
#     ]
# ]Below is another example that is a little more complicated. You'll notice that if the status of a VIP is down, the output does not include the portion. So in the case that we get crappy, inconsistent output from a device, we still can deal with it fairly easily. The interesting part in this example, is that we can apply a macro to a block of the template, or to an individual line in the template. A macro in ttp is simply a python function that is wrapped into a <macro> tag inside of the XML template.
Macro (Python Function)
def split_end(data):
    print(data)
    if "Down" in data['line_remainder']:
        data['internal_server_portion'] = ""
        data['internal_server_state'] = "Down"
        del data['line_remainder']
    elif "Up" in data['line_remainder']:
        data['internal_server_portion'] = data['line_remainder'].split()[0]
        data['internal_server_state'] = data['line_remainder'].split()[1]
        del data['line_remainder']
return dataFull Example
#!/usr/bin/env python
from ttp import ttp

data_to_parse = """
*Virtual Server : LO_PARTNET-AL8.COM-NGINX-EXT 68.58.239.12   All Up

    +port 80  tcp ====>LO_PARTNET-AL8.COM-NGINX_HTTP State :All Up
    +LO_PARTNET-AL8.COM-NGINX:80 10.44.16.220        State : Up

    +port 443  tcp ====>LO_PARTNET-AL8.COM-NGINX_HTTPS    State :All Up
    +LO_PARTNET-AL8.COM-NGINX:443 10.44.16.220        State : Up

*Virtual Server : C4_SELLER.BLAH.COM-EXT 64.58.239.31    Down

    +port 80  http ====>C4_SELLER.BLAH.COM-HTTP State :Down
    +C4_SELLER.BLAH.COM:80      10.44.16.177        State : Down

    +port 443  tcp ====>C4_SELLER.BLAH.COM-HTTPS    State :Down
    +C4_SELLER.BLAH.COM:443     10.44.16.177        State : Down
"""


ttp_template = """
<macro>
def split_end(data):
    if "Down" in data['line_remainder']:
        data['internal_server_portion'] = ""
        data['internal_server_state'] = "Down"
        del data['line_remainder']
    elif "Up" in data['line_remainder']:
        data['internal_server_portion'] = data['line_remainder'].split()[0]
        data['internal_server_state'] = data['line_remainder'].split()[1]
        del data['line_remainder']
    return data
</macro>

<group name="virtual-servers*">
*Virtual Server : {{ name }} {{ ip }} {{ portion | re("(?:\S+)?") }} {{ state }}
<group name="slb-servers*" macro="split_end">
    +port {{ port_no }} {{ protocol }} ====>{{ internal_service_name }} State :{{ line_remainder | re(".+") }}
{{ ignore("\t+") }}+{{internal_server_name}}:{{ internal_port }}                 {{ internal_server_ip }}         State : {{ internal_server_state }}
</group>
</group>
"""

parser = ttp(data=data_to_parse, template=ttp_template)
parser.parse()

# Results as multiline string
results = parser.result(format='json')[0]

print(results)


########################
#        Output        #
########################

# [
#     {
#         "virtual-servers": [
#             {
#                 "ip": "68.58.239.12",
#                 "name": "LO_PARTNET-AL8.COM-NGINX-EXT",
#                 "portion": "All",
#                 "slb-servers": [
#                     {
#                         "internal_port": "80",
#                         "internal_server_ip": "10.44.16.220",
#                         "internal_server_name": "LO_PARTNET-AL8.COM-NGINX",
#                         "internal_server_portion": "All",
#                         "internal_server_state": "Up",
#                         "internal_service_name": "LO_PARTNET-AL8.COM-NGINX_HTTP",
#                         "port_no": "80",
#                         "protocol": "tcp"
#                     },
#                     {
#                         "internal_port": "443",
#                         "internal_server_ip": "10.44.16.220",
#                         "internal_server_name": "LO_PARTNET-AL8.COM-NGINX",
#                         "internal_server_portion": "All",
#                         "internal_server_state": "Up",
#                         "internal_service_name": "LO_PARTNET-AL8.COM-NGINX_HTTPS",
#                         "port_no": "443",
#                         "protocol": "tcp"
#                     }
#                 ],
#                 "state": "Up"
#             },
#             {
#                 "ip": "64.58.239.31",
#                 "name": "C4_SELLER.BLAH.COM-EXT",
#                 "portion": "",
#                 "slb-servers": [
#                     {
#                         "internal_port": "80",
#                         "internal_server_ip": "10.44.16.177",
#                         "internal_server_name": "C4_SELLER.BLAH.COM",
#                         "internal_server_portion": "",
#                         "internal_server_state": "Down",
#                         "internal_service_name": "C4_SELLER.BLAH.COM-HTTP",
#                         "port_no": "80",
#                         "protocol": "http"
#                     },
#                     {
#                         "internal_port": "443",
#                         "internal_server_ip": "10.44.16.177",
#                         "internal_server_name": "C4_SELLER.BLAH.COM",
#                         "internal_server_portion": "",
#                         "internal_server_state": "Down",
#                         "internal_service_name": "C4_SELLER.BLAH.COM-HTTPS",
#                         "port_no": "443",
#                         "protocol": "tcp"
#                     }
#                 ],
#                 "state": "Down"
#             }
#         ]
#     }
# ]Overall, I really like Template Text Parser. I think it's a welcome addition to the network automation toolbox. I can see using ttp to extract data from existing configurations and building a data structure that can then be used as input for configuration generation using Jinja2 templating.
PyATS & Genie
PyATS and Genie are Cisco libraries that have been developed by Cisco and released to the general public for a year or two now. They are really starting to gain traction after their very public introduction at Cisco Live US 2019 on the DevNet floor. Most of the tasks you can perform with PyATS and Genie is exposed via a command-line utility, but you can also invoke the parsers directly from python as well. These examples are simply using it for it's parsing capability, however this is only one of its many features. It is powerful, and can do so much more than what is described in this example.
Here is an example of parsing a show command with one of the 1200+ parsers (more being added every month) using the genie cli tool.
$ genie parse "show ip bgp summary" --testbed-file testbed.yml

{
  "bgp_id": 65530,
  "vrf": {
    "default": {
      "neighbor": {
        "121.22.22.22": {
          "address_family": {
            "": {
              "as": 1222,
              "bgp_table_version": 1,
              "input_queue": 0,
              "local_as": 65530,
              "msg_rcvd": 0,
              "msg_sent": 0,
              "output_queue": 0,
              "route_identifier": "101.1.1.1",
              "routing_table_version": 1,
              "state_pfxrcd": "Idle",
              "tbl_ver": 1,
              "up_down": "never",
              "version": 4
            }
          }
        }
      }
    }
  }
}
This example is the same as above, but invoking it from python natively instead of from the cli command.
#!/usr/bin/env python3

from genie.testbed import load
from pprint import pprint


testbed = load('testbed.yml')

testbed.devices['csr1000v-1'].connect()

output = testbed.devices['csr1000v-1'].parse('show ip bgp summary')

pprint(output)

########################
#        Output        #
########################

# {
#   "bgp_id": 65530,
#   "vrf": {
#     "default": {
#       "neighbor": {
#         "121.22.22.22": {
#           "address_family": {
#             "": {
#               "as": 1222,
#               "bgp_table_version": 1,
#               "input_queue": 0,
#               "local_as": 65530,
#               "msg_rcvd": 0,
#               "msg_sent": 0,
#               "output_queue": 0,
#               "route_identifier": "101.1.1.1",
#               "routing_table_version": 1,
#               "state_pfxrcd": "Idle",
#               "tbl_ver": 1,
#               "up_down": "never",
#               "version": 4
#             }
#           }
#         }
#       }
#     }
#   }
# }
Here is another example, except this time, there is no parser written by Cisco. Also, it is not being run on a live device, but output that was already collected by some other means. This uses the generic tabular parsing functionality of Genie called parsergen.
#!/usr/bin/env python3

from pyats.datastructures import AttrDict
from genie import parsergen
from genie.conf.base import Device, Testbed
from pprint import pprint


nos = "ios"

cli_output = r'''
IPSLAs Latest Operation Summary
Codes: * active, ^ inactive, ~ pending
All Stats are in milliseconds. Stats with u are in microseconds

ID           Type           Destination       Stats               Return        Last
                                                                  Code          Run
------------------------------------------------------------------------------------------------
*1           udp-jitter      10.0.0.2          RTT=900u           OK             20 seconds ago
*2           icmp-echo       10.0.0.2          RTT=1              OK              3 seconds ago
'''

# Boilerplate code to get the parser functional
tb = Testbed()
device = Device("new_device", os=nos)

device.custom.setdefault("abstraction", {})["order"] = ["os"]
device.cli = AttrDict({"execute": None})

# Tabular data headers
# This is fine for single line headers
# headers = ['ID', 'Type', 'Destination', 'Stats', 'Return', 'Last']

# Corrected version from Cisco pyATS team for multiline headers
headers = [['ID', 'Type', 'Destination', 'Stats', 'Return', 'Last'], ['', '', '', '', 'Code', 'Run']]

# Do the parsing
result = parsergen.oper_fill_tabular(device_output=cli_output, device_os=nos, header_fields=headers)

# Structured data, but it has a blank entry because of the first line of the output being blank under the headers.
structured_output = result.entries

# print output
pprint(structured_output)

########################
#        Output        #
########################

# {'*1': {'Destination ': '10.0.0.2',
#         'ID ': '*1',
#         'Last Run': '20 seconds ago',
#         'Return Code': 'OK',
#         'Stats ': 'RTT=900u',
#         'Type ': 'udp-jitter'},
#  '*2': {'Destination ': '10.0.0.2',
#         'ID ': '*2',
#         'Last Run': '3 seconds ago',
#         'Return Code': 'OK',
#         'Stats ': 'RTT=1',
#         'Type ': 'icmp-echo'}}
This is just scratching the surface of the capabilities of the pyATS and Genie duo. It is a very powerful set of tools, and the parser functionality is no exception. It is definitely another great tool in the network automation toolbox.
Parse Genie - Ansible Plugin
Parse Genie is an Ansible filter plugin that exposes the functionality of Cisco Genie parsers (as shown above) to users of Ansible. Below is an example of utilizing Parse Genie in an Ansible playbook.
---

- hosts: csr1000v
  gather_facts: False
  tasks:
  - name: Read in parse_genie role
    include_role:
      name: clay584.parse_genie

  - name: Include vars
    include_vars:
      file: parse_genie_generic_commands.yml
      name: parse_genie

  - name: Run show interfaces command
    ios_command:
      commands: show interfaces
    register: interfaces

  - name: Print Structured Data
    debug:
      msg: "{{ interfaces['stdout'][0] | parse_genie(command='show interfaces', os='iosxe') }}"
    delegate_to: localhost

  - name: Run show interfaces gigabitEthernet 1 accounting
    ios_command:
      commands: show interfaces gigabitEthernet 1 accounting
    register: show_intf_accounting

  - name: Parse show interfaces gigabitEthernet 1 accounting command with tabular parsing capability
    debug:
      msg: "{{ show_intf_accounting['stdout'][0] | parse_genie(command='show interfaces gigabitEthernet 1 accounting', os='iosxe', generic_tabular=True, generic_tabular_metadata=parse_genie) }}"
delegate_to: localhostThe above playbook renders this output which is just a test playbook that shows the parsing capability.
ansible-playbook -i inventory devnet.yml

PLAY [csr1000v] ******************************************************************************

TASK [Read in parse_genie role] ******************************************************************************

TASK [Include vars] ******************************************************************************
ok: [csr1000v]

TASK [Run show interfaces command] ******************************************************************************
ok: [csr1000v]

TASK [Print Structured Data] ******************************************************************************
ok: [csr1000v -> localhost] => {
    "msg": {
        "GigabitEthernet1": {
            "arp_timeout": "04:00:00",
            "arp_type": "arpa",
            "auto_negotiate": true,
            "bandwidth": 1000000,
            "counters": {
                "in_broadcast_pkts": 0,
                "in_crc_errors": 0,
                "in_errors": 0,
                "in_frame": 0,
                "in_giants": 0,
                "in_ignored": 0,
                "in_mac_pause_frames": 0,
                "in_multicast_pkts": 0,
                "in_no_buffer": 0,
                "in_octets": 1044354749,
                "in_overrun": 0,
                "in_pkts": 3985510,
                "in_runts": 0,
                "in_throttles": 0,
                "in_watchdog": 0,
                "last_clear": "never",
                "out_babble": 0,
                "out_buffer_failure": 0,
                "out_buffers_swapped": 0,
                "out_collision": 0,
                "out_deferred": 0,
                "out_errors": 0,
                "out_interface_resets": 0,
                "out_late_collision": 0,
                "out_lost_carrier": 0,
                "out_mac_pause_frames": 0,
                "out_no_carrier": 0,
                "out_octets": 325794520,
                "out_pkts": 950886,
                "out_underruns": 0,
                "out_unknown_protocl_drops": 3826,
                "rate": {
                    "in_rate": 3000,
                    "in_rate_pkts": 4,
                    "load_interval": 300,
                    "out_rate": 1000,
                    "out_rate_pkts": 1
                }
            },
            "delay": 10,
            "description": "MANAGEMENT INTERFACE - DON'T TOUCH ME",
            "duplex_mode": "full",
            "enabled": true,
            "encapsulations": {
                "encapsulation": "arpa"
            },
            "flow_control": {
                "receive": false,
                "send": false
            },
            "ipv4": {
                "10.10.20.48/24": {
                    "ip": "10.10.20.48",
                    "prefix_length": "24"
                }
            },
            "keepalive": 10,
            "last_input": "00:00:00",
            "last_output": "00:00:00",
            "line_protocol": "up",
            "link_type": "auto",
            "mac_address": "0050.56bb.e99c",
            "media_type": "Virtual",
            "mtu": 1500,
            "oper_status": "up",
            "output_hang": "never",
            "phys_address": "0050.56bb.e99c",
            "port_channel": {
                "port_channel_member": false
            },
            "port_speed": "1000",
            "queues": {
                "input_queue_drops": 0,
                "input_queue_flushes": 0,
                "input_queue_max": 375,
                "input_queue_size": 0,
                "output_queue_max": 40,
                "output_queue_size": 0,
                "total_output_drop": 0
            },
            "reliability": "255/255",
            "rxload": "1/255",
            "txload": "1/255",
            "type": "CSR vNIC"
        }
    }
}

TASK [Run show interfaces gigabitEthernet 1 accounting] ******************************************************************************
ok: [csr1000v]

TASK [Parse show interfaces gigabitEthernet 1 accounting command with tabular parsing capability] ************************************************
ok: [csr1000v -> localhost] => {
    "msg": {
        "ARP": {
            "Chars In": "6424500",
            "Chars Out": "2736960",
            "Pkts In": "107075",
            "Pkts Out": "45616",
            "Protocol": "ARP"
        },
        "IP": {
            "Chars In": "65006855",
            "Chars Out": "323058499",
            "Pkts In": "543123",
            "Pkts Out": "905276",
            "Protocol": "IP"
        },
        "IPv6": {
            "Chars In": "22040172",
            "Chars Out": "0",
            "Pkts In": "226178",
            "Pkts Out": "0",
            "Protocol": "IPv6"
        },
        "Other": {
            "Chars In": "6967268",
            "Chars Out": "2737054",
            "Pkts In": "114233",
            "Pkts Out": "45617",
            "Protocol": "Other"
        }
    }
}

PLAY RECAP ******************************************************************************
csr1000v : ok=5 changed=0 unreachable=0 failed=0 skipped=0 rescued=0 ignored=0 Genie Functionality From Netmiko
Netmiko is another tool for connecting and interacting with devices and it has recently added support for Cisco Genie as well. Just a simple parameter on the send_command method and you can parse the show command output coming back from a device in Netmiko (so long as there is a Genie parser).
#!/usr/bin/env python3

from pprint import pprint
from netmiko import ConnectHandler
import json


conn = ConnectHandler(
    host="ios-xe-mgmt-latest.cisco.com",
    device_type="cisco_xe",
    username="developer",
    password="C1sco12345",
    port=8181
)

output = conn.send_command("show ip route", use_genie=True)

print(json.dumps(output, indent=4, sort_keys=True))


########################
#        Output        #
########################

# {
#     "vrf": {
#         "default": {
#             "address_family": {
#                 "ipv4": {
#                     "routes": {
#                         "0.0.0.0/0": {
#                             "active": true,
#                             "metric": 0,
#                             "next_hop": {
#                                 "next_hop_list": {
#                                     "1": {
#                                         "index": 1,
#                                         "next_hop": "10.10.20.254",
#                                         "outgoing_interface": "GigabitEthernet1"
#                                     }
#                                 }
#                             },
#                             "route": "0.0.0.0/0",
#                             "route_preference": 1,
#                             "source_protocol": "static",
#                             "source_protocol_codes": "S*"
#                         },
#                         "10.10.20.0/24": {
#                             "active": true,
#                             "next_hop": {
#                                 "outgoing_interface": {
#                                     "GigabitEthernet1": {
#                                         "outgoing_interface": "GigabitEthernet1"
#                                     }
#                                 }
#                             },
#                             "route": "10.10.20.0/24",
#                             "source_protocol": "connected",
#                             "source_protocol_codes": "C"
#                         },
#                         "10.10.20.48/32": {
#                             "active": true,
#                             "next_hop": {
#                                 "outgoing_interface": {
#                                     "GigabitEthernet1": {
#                                         "outgoing_interface": "GigabitEthernet1"
#                                     }
#                                 }
#                             },
#                             "route": "10.10.20.48/32",
#                             "source_protocol": "local",
#                             "source_protocol_codes": "L"
#                         },
#                             "route": "74.74.74.1/32",
#                             "source_protocol": "connected",
#                             "source_protocol_codes": "C"
#                         }
#                     }
#                 }
#             }
#         }
#     }
# }
NTC Templates
Network To Code has developed a fairly robust library of TextFSM parsers called ntc-templates. The templates can be used directly in your code or utilized from a library such as Netmiko. Here is an example of using ntc-templates natively in python.
#!/usr/bin/env python3

from ntc_templates.parse import parse_output
import json


vlan_output = (
        "VLAN Name                             Status    Ports\n"
        "---- -------------------------------- --------- -------------------------------\n"
        "1    default                          active    Gi0/1\n"
        "10   Management                       active    \n"
        "50   Vlan50                           active    Fa0/1, Fa0/2, Fa0/3, Fa0/4, Fa0/5,\n"
        "                                                Fa0/6, Fa0/7, Fa0/8\n"
    )

vlan_parsed = parse_output(platform="cisco_ios", command="show vlan", data=vlan_output)

print(json.dumps(vlan_parsed, indent=4, sort_keys=True))

########################
#        Output        #
########################

# [
#     {
#         "interfaces": [
#             "Gi0/1"
#         ],
#         "name": "default",
#         "status": "active",
#         "vlan_id": "1"
#     },
#     {
#         "interfaces": [],
#         "name": "Management",
#         "status": "active",
#         "vlan_id": "10"
#     },
#     {
#         "interfaces": [
#             "Fa0/1",
#             "Fa0/2",
#             "Fa0/3",
#             "Fa0/4",
#             "Fa0/5",
#             "Fa0/6",
#             "Fa0/7",
#             "Fa0/8"
#         ],
#         "name": "Vlan50",
#         "status": "active",
#         "vlan_id": "50"
#     }
# ]
NTC Templates Functionality From Netmiko
This example is the same as above, except using ntc-templates instead of Cisco Genie parsers.
#!/usr/bin/env python3

from pprint import pprint
from netmiko import ConnectHandler
import json


conn = ConnectHandler(
    host="ios-xe-mgmt-latest.cisco.com",
    device_type="cisco_ios",
    username="developer",
    password="C1sco12345",
    port=8181
)

output = conn.send_command("show ip interface brief", use_textfsm=True)

print(json.dumps(output, indent=4, sort_keys=True))


########################
#        Output        #
########################

# [
#     {
#         "intf": "GigabitEthernet1",
#         "ipaddr": "10.10.20.48",
#         "proto": "up",
#         "status": "up"
#     },
#     {
#         "intf": "GigabitEthernet2",
#         "ipaddr": "unassigned",
#         "proto": "down",
#         "status": "administratively down"
#     },
#     {
#         "intf": "GigabitEthernet3",
#         "ipaddr": "unassigned",
#         "proto": "down",
#         "status": "administratively down"
#     },
#     {
#         "intf": "Loopback22",
#         "ipaddr": "unassigned",
#         "proto": "up",
#         "status": "up"
#     },
#     {
#         "intf": "Port-channel1",
#         "ipaddr": "unassigned",
#         "proto": "down",
#         "status": "down"
#     }
# ]Yangify
Yangify is an interesting project that aims to take native configuration and parse it into a standard JSON data structure that validates against a YANG model. It also has the ability to translate instance data (JSON) into native device configuration. From my understanding, it performs a similar operation to that of Cisco NSO's network element drivers (NED). I have not had any free time to give it a go, but if the need arises, it is yet another tool in the toolbox. Staying on topic, the parsing functionality is implemented in pure python and therefore is left up to the ability of the user to write an effective parser and/or translator. The main benefit here is that it gives you the ability to validate instance data against a YANG model, which will ensure that the data is valid before it gets deployed to the network.
NAPALM
NAPALM is a library to provide a consistent, vendor-agnostic API to the network. It supports many different device types, and has a lot of functionality around interacting and managing a live network. However, since this is a focused post around parsing, let's just focus on NAPALM's getters. These are get methods that pull back runtime information in a standard format. Example getters are get_arp_table, get_facts, etc. Here is a list of all the supported getters.
$ napalm --user developer --password C1sco12345 --vendor ios --optional_args port=8181 ios-xe-mgmt-latest.cisco.com call get_facts
{
    "uptime": 1139220,
    "vendor": "Cisco",
    "os_version": "Virtual XE Software (X86_64_LINUX_IOSD-UNIVERSALK9-M), Version 16.11.1a, RELEASE SOFTWARE (fc1)",
    "serial_number": "989DIA2RYVT",
    "model": "CSR1000V",
    "hostname": "csr1000v-1",
    "fqdn": "csr1000v-1.cisco.com",
    "interface_list": [
        "GigabitEthernet1",
        "GigabitEthernet2",
        "GigabitEthernet3",
        "Loopback22",
        "Loopback55",
        "Loopback72",
        "Loopback73",
        "Loopback74",
        "Loopback100",
        "Loopback101",
        "Loopback803",
        "Port-channel1",
        "VirtualPortGroup0"
    ]
}Here is an example using connecting and retrieving structured data from python.
#!/usr/bin/env python3

from napalm import get_network_driver
import json


driver = get_network_driver('ios')
optional_args = {'port': 8181}
device = driver('ios-xe-mgmt-latest.cisco.com', 'developer', 'C1sco12345', optional_args=optional_args)
device.open()

print(json.dumps(device.get_facts(), indent=4, sort_keys=True))

########################
#        Output        #
########################

# {
#     "fqdn": "csr1000v-1.cisco.com",
#     "hostname": "csr1000v-1",
#     "interface_list": [
#         "GigabitEthernet1",
#         "GigabitEthernet2",
#         "GigabitEthernet3",
#         "Loopback22",
#         "Loopback55",
#         "Loopback72",
#         "Loopback73",
#         "Loopback74",
#         "Loopback100",
#         "Loopback101",
#         "Loopback803",
#         "Port-channel1",
#         "VirtualPortGroup0"
#     ],
#     "model": "CSR1000V",
#     "os_version": "Virtual XE Software (X86_64_LINUX_IOSD-UNIVERSALK9-M), Version 16.11.1a, RELEASE SOFTWARE (fc1)",
#     "serial_number": "989DIA2RYVT",
#     "uptime": 1139700,
#     "vendor": "Cisco"
# }
Sublime Text
Sublime Text is one of my all-time favorite tools for working with text. I use it for a lot of ad-hoc text manipulation due to it's advanced text capabilities. This example will show advanced find/replace using regex. Specifically, taking a list of vlans and names from a CSV file, and generating a configuration snippet. This is a simple, contrived example, but the possibilities are endless for taking data, simple regex with capture groups, and creating configurations.
100,VL100
200,VL200
300,VL300
400,VL400
500,VL500
600,VL600(\d+),(\S+)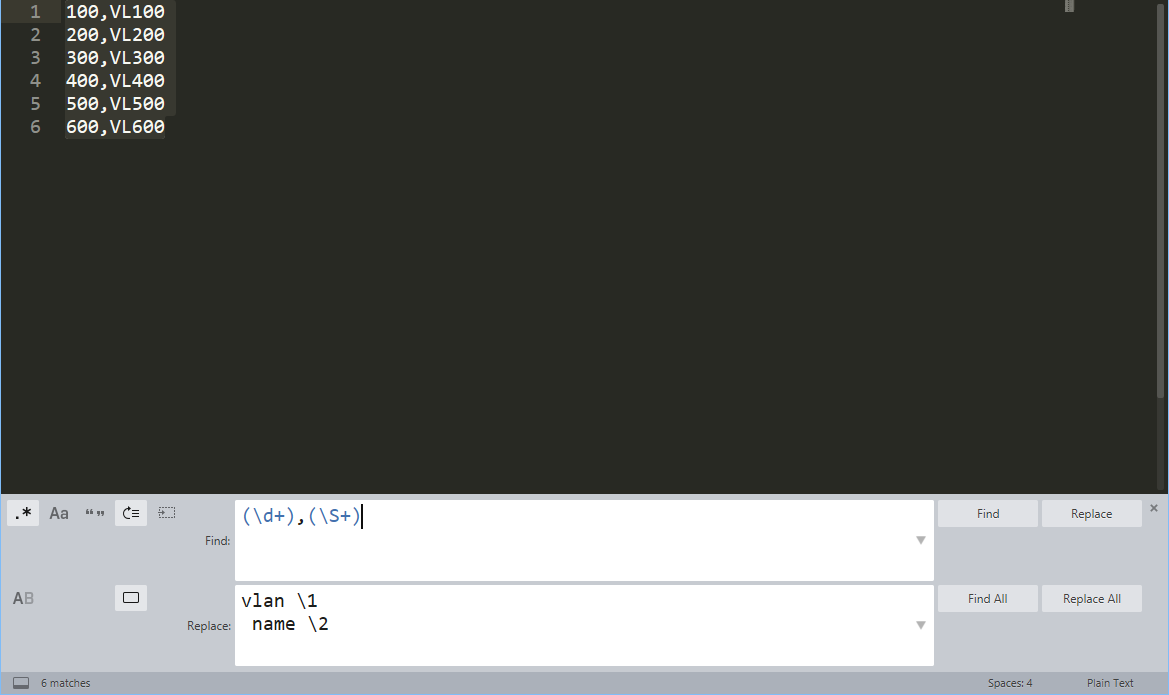
vlan 100
 name VL100
vlan 200
 name VL200
vlan 300
 name VL300
vlan 400
 name VL400
vlan 500
 name VL500
vlan 600
name VL600Grep/Sed/Awk
Standard Linux command-line tools are also invaluable and save a lot of time. I use these tools for generating commands from data for very repetitive tasks that are highly error-prone. Here is a prime example; removing all ACL lines for which there are zero hit counts. It takes the output of show access-list from a Cisco ASA, and generates the no commands necessary to remove them all from the firewall. I recently used this to remove 2273 unused ACL lines in a customer firewall. Instead of spending hours pouring through the output and hand-crafting no commands, I just used grep, sed, and awk and had my maintenance procedure in a couple minutes.
show access-list inside
access-list inside; 4372 elements; name hash: 0x45467dcb
access-list inside line 1 extended permit udp any any eq bootpc (hitcnt=174128) 0xf561a60e
access-list inside line 2 remark websense
access-list inside line 3 remark FTP for prod
access-list inside line 4 remark SFTP for prod
access-list inside line 5 extended permit tcp host 10.50.27.111 host 111.111.111.204 eq ssh (hitcnt=58) 0xaa9a978c
access-list inside line 6 remark TEST_Clients
access-list inside line 7 extended permit object-group Test_Clients_Ports object-group Test_Clients host 111.111.111.210 (hitcnt=0) 0xf7 acee1
  access-list inside line 7 extended permit tcp host 10.90.113.154 host 111.111.111.210 eq 11443 (hitcnt=0) 0x60eeec28
  access-list inside line 7 extended permit tcp host 10.90.113.155 host 111.111.111.210 eq 11443 (hitcnt=0) 0x7e4beb50
  access-list inside line 7 extended permit tcp host 10.90.113.154 host 111.111.111.210 eq 12443 (hitcnt=0) 0x5749ebb9
  access-list inside line 7 extended permit tcp host 10.90.113.155 host 111.111.111.210 eq 12443 (hitcnt=0) 0xe0e122de
access-list inside line 8 remark # 227771
access-list inside line 9 extended permit udp host 10.80.8.166 host 111.111.111.246 eq isakmp (hitcnt=0) 0x2bb214ad
access-list inside line 10 extended permit udp host 10.60.8.166 host 111.111.111.246 eq 4500 (hitcnt=0) 0x3c0b27d8$ grep -P "^access-list .+hitcnt=0" show_access_list_head10.txt | awk -F "(" '{print "no " $1}' | sed -r 's/line [[:digit:]]+ //'
no access-list inside extended permit object-group Test_Clients_Ports object-group Test_Clients host 111.111.111.210
no access-list inside extended permit udp host 10.80.8.166 host 111.111.111.246 eq isakmp
no access-list inside extended permit udp host 10.60.8.166 host 111.111.111.246 eq 4500What's the future hold?
Less regex I hope 😎. In summary, text parsing (and regex) is a necessary evil, but there are a lot of great tools available. You'll notice that most of the above examples require no use of regex at all. Leveraging the right tool for the job going forward lets us all focus on what we are here to do; operate networks. Hopefully this post serves as a fairly complete snapshot of the available tools out there and how to use them.